本文旨在回答第一部分刻意留白的两个问题。首先:为什么这个工作流成本高昂?答案在于要以“每项任务的成本”而非“每个 token 的成本”来思考。其次:智能体(Agent)是否比人类做得更好?答案需要基线数据、受控实验以及与决策挂钩的评分卡。
在本文中,你将学习一个计算真实模型成本的框架(包括定价页面上未显示的四个隐藏成本驱动因素),通过缓存、路由和输出约束降低每项任务成本的技术,以及通过人类基线、保留组实验和五维评分卡来衡量智能体投资回报率(ROI)的纪律。本文面向两类受众:负责优化杠杆的应用程序和平台工程师,以及需要向管理层证明智能体支出合理性的产品负责人和 FinOps 合作伙伴。
按 token 计价便于快速比较,但并不能反映你实际支付的金额。公布的费率反映的是单个 token 的成本。你的账单反映的是完成一项任务的成本。一项任务是你要求模型执行的完整工作单位:解决一封支持邮件、从一张发票中提取字段或回答一个用户问题。一项任务从请求开始到产生可用结果为止,无论它涉及多少次模型调用。
低价模型未必是运行成本更低的模型。较便宜的模型可能会将文本拆分为更多的 token,用填充词使响应变长,误读你的工具模式并进行循环修正,或者在回答问题之前消耗数千个推理 token。这些成本都不会出现在 Bedrock 定价页面上。
token 不是单词,且在不同模型之间并不等价。每个模型家族都使用不同的分词器和词汇表。相同的文本、代码或 JSON 有效载荷会被分割成不同数量的 token。如果模型 A 的列表价格低 15%,但其分词器对你的数据需要多 40% 的 token(这在结构化模式和数值数组中很常见),那么模型 B 反而更便宜。对于非英语文本,差距会更大:许多分词器会将非拉丁脚本拆分为相当于英文两到三倍的 token 数量。
考虑一个智能体工作流,该流程读取一封 750 字长的客户邮件,提取实体,调用 API 验证账户状态,并输出严格的 JSON。以下比较使用了示例价格(请务必根据你的数据和当前的 Bedrock 定价进行基准测试):
智能体 ROI 中最大的错误是在没有首先描述人类工作流的情况下试图证明价值。在构建或扩展智能体之前,用操作术语写下当前流程:什么触发了工作,涉及哪些人类角色,交接点在哪里,如何定义完成。这听起来像是官僚主义。它实际上是测量设计。下游的每一个仪器决策(什么算作一次运行,什么算作成功,人类时间花在哪里)都源于此描述。
查看原文
Part 1 of this series built the operating model that controls Amazon Bedrock spend: attribution with AWS Identity and Access Management (IAM) principal tags and Cost and Usage Report 2.0, observability with model invocation logging, enforcement at three tiers, and a review cadence. That layer answers who spent it, and you can stop them. It can’t tell you whether the spend was well spent.
This post answers two questions that Part 1 deliberately left open. First: Why is this workflow expensive? The answer requires thinking in cost per task, not cost per token. Second: Is the agent better than the humans were? The answer requires baselines, controlled experiments, and a scorecard tied to decisions.
In this post, you learn a framework for calculating true model cost (including four hidden cost drivers that the pricing page doesn’t show), techniques for reducing cost per task through caching, routing, and output constraints, and a discipline for measuring agent ROI with human baselines, holdout experiments, and a five-dimension scorecard. This post is written for two audiences: the application and platform engineers who own the optimization levers, and the product owners and FinOps partners who need to justify agent spend to leadership.
Cost per task, not cost per token
Price per token invites quick comparison, but it doesn’t reflect what you actually pay. The published rate reflects the cost of a single token. Your bill reflects the cost of completing a task. A task is one complete unit of work your application asks a model to do: resolve one support email, extract fields from one invoice, or answer one user question. A task runs from the request through to a usable result, however many model calls it takes.
The lower-priced model might not be the cheaper one to run. A cheaper model might fragment your text into more tokens, pad responses with filler, misread your tool schema and loop through corrections, or burn thousands of reasoning tokens before answering. None of these costs appear on the Bedrock pricing page.
The four hidden cost drivers
Four model characteristics determine what that published rate actually costs you on your workload.
Tokenizer efficiency
A token isn’t a word, and it is not equal across models. Every model family uses a different tokenizer and vocabulary. The same text, code, or JSON payload splits into different token counts. If Model A’s list price is 15 percent lower but its tokenizer needs 40 percent more tokens for your data (common with structured schemas and numerical arrays), Model B is cheaper. The gap widens for non-English text: many tokenizers fragment non-Latin scripts into two to three times more tokens than the equivalent English.
Output alignment and verbosity
Output tokens commonly cost 3–5x more than input tokens (the ratio varies by family. Refer to the Bedrock pricing page). A model that ignores formatting constraints like “return only raw JSON” makes you pay that output premium for filler words. A model that follows formatting instructions closely saves money by generating fewer of these more expensive output tokens.
Agentic loop efficiency
Agentic workflows change the cost math entirely. Tool use (function calling) lets a model invoke external functions, requiring a multi-turn loop: analyze the prompt, decide to call a tool, wait for the observation, generate an answer. Each turn re-sends the full conversation history and tool results as input tokens. A model that takes four turns (each one re-sending a larger context payload) costs far more than one that finishes in a single pass.
Reasoning overhead
Many models support extended thinking, working through a chain of thought before the visible answer. Reasoning tokens bill as output tokens, so a model that thinks for 2,000 tokens before a 200-token answer bills you for 2,200. Some models redact the reasoning while still charging for it. Start with reasoning turned off and enable it only when benchmarks show a quality gap that justifies the cost.
Cost per task: A worked example
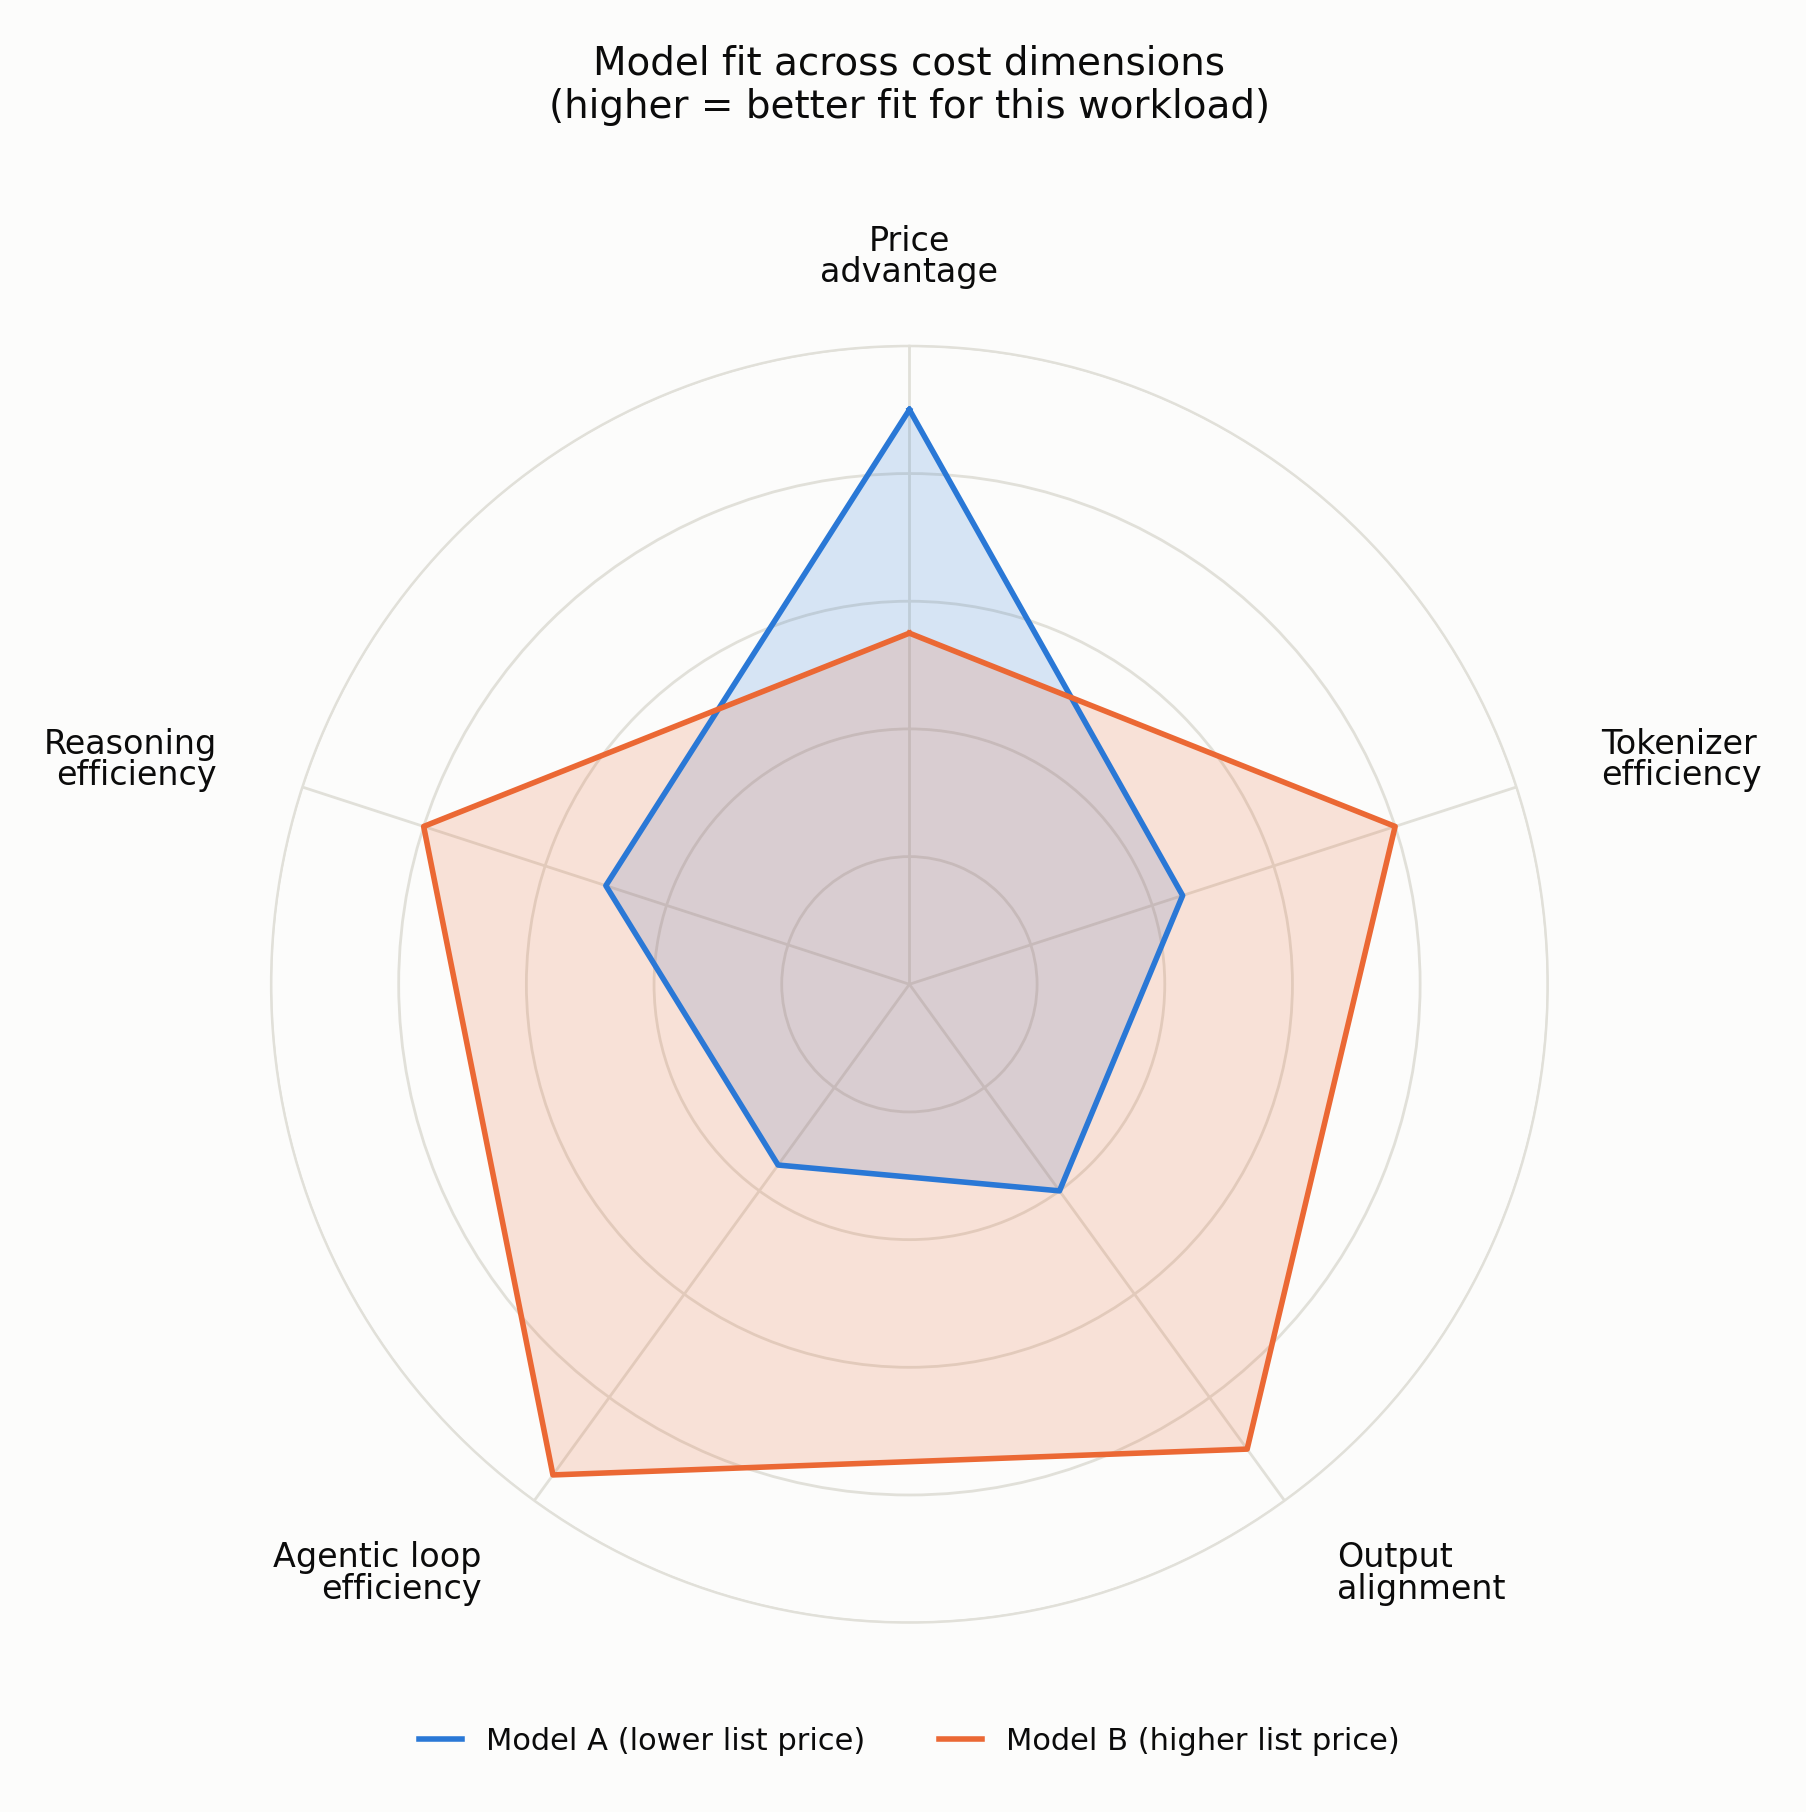
Figure 1: Comparing two models across five cost dimensions. List price is only one of five factors that determine actual cost
Consider an agentic workflow that reads a 750-word customer email, extracts entities, calls an API to verify account status, and outputs strict JSON. The following comparison uses illustrative prices (always benchmark against your own data and current Bedrock pricing):
Metric
Model A (lower list price)
Model B (higher list price)
Input list price
$0.50 / 1M tokens
$1.00 / 1M tokens
Output list price
$1.50 / 1M tokens
$3.00 / 1M tokens
Tokenizer efficiency (turn 1 input)
1,500 tokens
1,000 tokens
Output verbosity (final response)
450 tokens
150 tokens
Agentic loops required
3 turns (error correction)
1 turn (zero-shot)
Cumulative input tokens, all turns
6,150
1,000
Cumulative output tokens, all turns
750
150
Total task cost
$0.0042
$0.00145
Model A: (6,150 x $0.50 + 750 x $1.50) / 1,000,000 = $0.0042
Model B: (1,000 x $1.00 + 150 x $3.00) / 1,000,000 = $0.00145
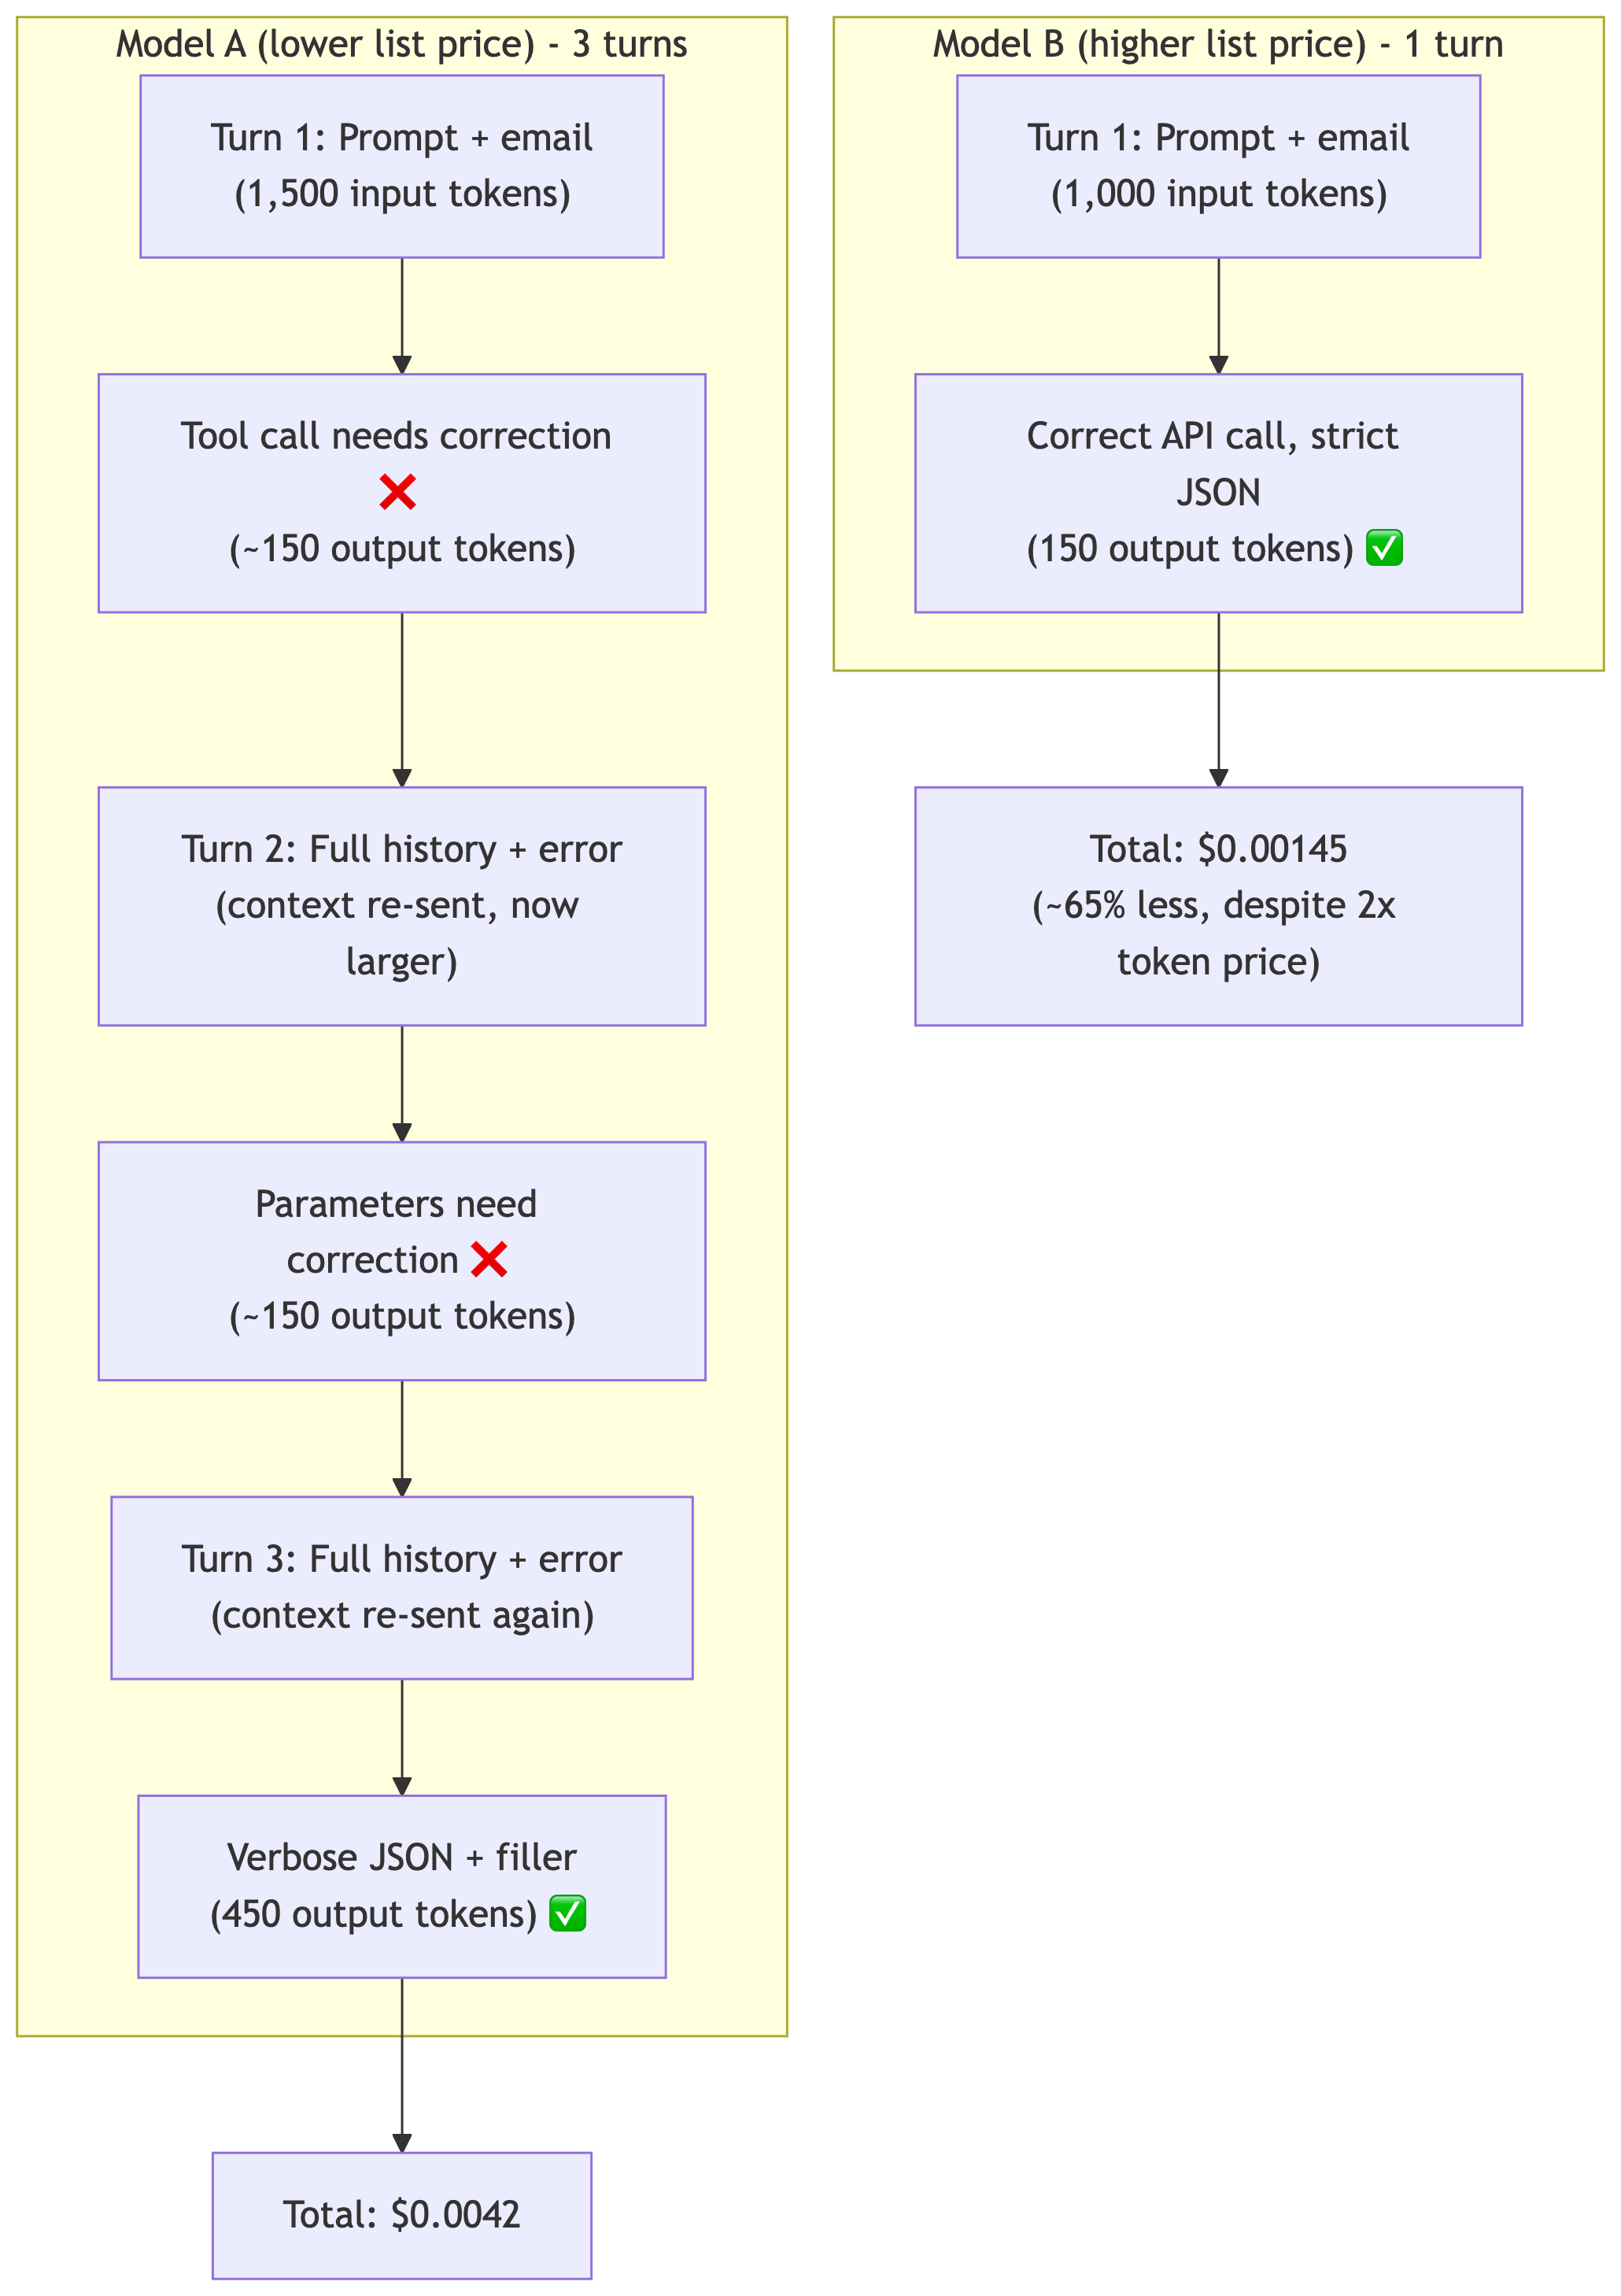
Figure 2: Why the higher-priced model costs 65% less. Each extra turn re-sends a growing context payload, compounding the bill
Why the 2x-priced model costs 65 percent less: three compounding factors. Model A’s tokenizer fragments the email into 50 percent more tokens, inflating every input payload. It pads its JSON with filler, tripling output tokens. And it misaligns with the tool schema, needing two correction turns that each re-send a growing history.
Cost per successful task
The preceding example assumes both models eventually succeed. In production they won’t, and a failure is rarely free. The formulas:
For retry-until-success workflows:
cost per successful task = cost per attempt / success rate
For escalate-on-failure workflows:
cost per successful task = cost per attempt + (1 - success rate) x escalation cost
Input further splits into three buckets when prompt caching is active: uncached input at base rate, cache reads below base rate, and cache writes above base rate.
Measuring it on your own workload
Which model is actually cheaper only shows up when you benchmark against your own data. Amazon Bedrock model evaluation is the managed feature for the quality half of that: define criteria, upload your prompt datasets, and get scored results with automatic metrics and optional human review, with no custom infrastructure required.
Quality scores alone don’t produce a bill, though. Three more Bedrock features supply the token and turn counts you price against them:
- CountTokens returns the input token count a given model would charge for a given payload without running inference. It’s the cheapest way to compare tokenizer efficiency (driver #1) across candidates before you spend anything on generation.
- Model invocation response carries a
usage block with inputTokens, outputTokens, cacheReadInputTokens, and cacheWriteInputTokens. Accumulating those across the turns of a single task gives you the four terms of the preceding cost-per-attempt formula. One gotcha: when caching is enabled, inputTokens counts only the uncached tokens, so your total input volume is inputTokens + cacheReadInputTokens + cacheWriteInputTokens. Sum them to know the footprint, but price them separately, since the three bill at different rates. Evaluate this multiple times throughout your journey and set the cache checkpoints based on what is the active current load. The drift in cache checkpoints happens as the application progresses and the tools become stale. This means that you will be writing more to the cache in 3 months from now when the drift has happened. Evaluating your data constantly for optimal cache usage becomes a primary lever to reduce cost.
- Model invocation logging writes per-invocation token counts to Amazon Simple Storage Service (Amazon S3) or Amazon CloudWatch Logs, so you can measure turns-to-completion against real production traffic instead of a sample. Tag calls with request metadata to slice those logged token counts by team, feature, or experiment. However, these are log fields, not cost allocation tags, and never appear in AWS Cost Explorer or your Cost and Usage Report. Application inference profiles do reach both, at a grain of one usage type per day. That grain is right for chargeback but too coarse for cost per task. Multiplying logged token counts by the published rates gives you a near real-time estimate rather than an invoice. It won’t reflect commitments, batch pricing, or provisioned throughput unless you model them. Reconcile against your Cost and Usage Report before you treat it as the bill.
Reducing cost per task: Four levers
Each of the four drivers has a lever, and each is documented in depth. Prompt caching cuts the re-sent context that made Model A expensive, which makes it the largest win on agentic paths. Intelligent prompt routing sends the easy requests to a cheaper model in the same family. A tool schema plus a maxTokens cap holds verbosity down more reliably than prose instructions do, and extended thinking stays off until a benchmark shows it earns its cost back. Batch inference halves the rate on bulk single-turn work, though it rules out tool calling and multi-turn exchange.
Proving agent ROI: Describe the human baseline
Efficient isn’t the same as valuable. An agent can be perfectly optimized and still not be worth running. The question that decides budgets is: is the agent better than the humans were?
Document the human process first
The biggest mistake in agent ROI is trying to prove value without first describing the human workflow. Before building or scaling an agent, write down the current process in operational terms: what triggers the work, which human roles are involved, where the handoffs sit, how completion is defined. This sounds like bureaucracy. It’s actually measurement design. Every instrumentation decision downstream (what counts as a run, what counts as success, where human time is spent) falls out of this description.
Measure the baseline before the agent ships
With the process described, measure the human baseline over a meaningful window: time to completion, queue time, active effort, reopen rate, escalation rate, cost per task, and outcome quality. Baselines must be measured before the agent goes live, not reconstructed from memory after the fact. Retrospective baselines are systematically flattering to the agent: people remember the average case and forget the fast ones.
Instrument the workflow as an experiment
After the baseline exists, instrument the agent workflow as an experiment from day one. Every run gets a trace ID, and every meaningful step is observable. A workflow-run record aggregates everything above the model call into a single analyzable unit:
{
  "runId": "run-8f3a2c",
  "workflow": "renewal-risk-summary",
  "agent": "renewal-agent",
  "principalArn": "arn:aws:sts::123456789012:assumed-role/BedrockRuntimeRole/gw-alex",
  "team": "sales-ai",
  "costCenter": "CC-2041",
  "experiment": {
    "variant": "treatment",
    "holdout": False,
    "promptVersion": "v14",
    "policyVersion": "2026-07"
  },
  "ops": {
    "latencyMs": 41200,
    "retries": 1,
    "toolCalls": 6,
    "humanApprovals": 1,
    "humanMinutes": 35,
    "escalations": 0
  },
  "econ": {
    "inputTokens": 48210,
    "outputTokens": 3105,
    "cacheReadTokens": 31500,
    "estCostUsd": 0.87
  },
  "outcome": {
    "status": "success",
    "accepted": True,
    "reopened": False,
    "revenueEventId": "opp-44121"
  }
}
Three fields deserve emphasis:
experiment block: Stamped at run creation and propagated into Bedrock request metadata, so model-level and workflow-level records join cleanly.
humanMinutes: What most teams omit and most need. Without it, “the agent did the work” silently excludes the 35 minutes a human spent reviewing it.
revenueEventId: The hook that makes revenue attribution possible later. It costs nothing to record and can’t be reconstructed afterward.
The rule: If the workflow telemetry can’t answer the business question, the instrumentation is incomplete.
Join cost to outcomes
With invocation logs landing in Amazon S3 (Part 1) and workflow-run records in your analytics store, one join produces the metrics that matter. Amazon Bedrock logs record tokens, not dollars, so first build a view that prices each invocation from token counts and your model rate sheet, aggregated by run ID. Then query with Amazon Athena:
SELECT
  w.workflow,
  w.variant,
  COUNT(*) AS runs,
  SUM(IF(w.outcome_status = 'success', 1, 0)) AS successes,
  ROUND(SUM(c.est_cost_usd) /
    NULLIF(SUM(IF(w.outcome_status = 'success', 1, 0)), 0), 2)
    AS cost_per_success,
  ROUND(SUM(w.retries) * 1.0 /
    NULLIF(SUM(IF(w.outcome_status = 'success', 1, 0)), 0), 2)
    AS retries_per_success,
  ROUND(SUM(w.human_minutes) /
    NULLIF(SUM(IF(w.outcome_status = 'success', 1, 0)), 0), 1)
    AS human_min_per_success
FROM workflow_runs w
JOIN invocation_costs_by_run c ON c.run_id = w.run_id
GROUP BY w.workflow, w.variant
ORDER BY cost_per_success DESC
Note: Column names and join keys shown in the preceding query are illustrative. Verify against your invocation log schema and workflow telemetry store, which might vary by implementation.
Cost per successful outcome, retries per success, and human minutes per success are the three numbers that survive contact with a skeptical CFO. Cost per call flatters agents that loop. Cost per success doesn’t. Note the variant grouping: the same query, split by experiment arm, is the ROI comparison.
Compare agents and humans correctly
The most credible evaluation is an A/B or holdout test. Controlled treatment and control groups compare the agent-assisted workflow against the human baseline without confusing the result with market, seasonal, or organizational changes.
For customer-facing or revenue-linked workflows, randomize at the visitor, lead, account, or case level. For internal workflows (support operations, coding assistants), use matched cohorts: teams, repository groups, or pods.
The comparison covers four dimensions:
Efficiency: time to completion, hours recovered, queue-time reduction.
Quality: error rate, approval rate, reopen rate, escalation rate.
Cost: cost per task, cost per successful outcome, total cost to serve.
Business value: conversion lift, retention lift, expansion rate, revenue per rep or per workflow.
If the agent improves one dimension while meaningfully degrading another, the result is ambiguous and the deployment needs tuning.
Revenue: The hardest metric
Efficiency gains are the easiest part of the ROI story to prove. Revenue impact is harder, and it is the metric leadership funds against. In revenue-adjacent workflows, measure whether the agent improves conversion, time-to-response, deal progression, or revenue per rep. Holdout tests are the most reliable way to separate incremental revenue attributable to the agent from general business momentum.
When revenue lift is real, the conversation changes. The organization stops asking whether the Bedrock bill went up and starts asking whether the additional spend is buying a meaningful increase in business output.
The scorecard
Based on what we have observed working with customers, a strong operating model doesn’t require fifty metrics. What works is a small scorecard tied to decisions, reviewed on a regular cadence for every production agent.
The following thresholds are starting points, not prescriptions. Calibrate them against your own fleet data and organizational context.
Dimension
Metric
Green
Yellow
Red
Adoption
Active users / intended users
>70%
40-70%
<40%
Quality
Tasks completed without rework
>90%
75-90%
<75%
Efficiency
Hours recovered per week
>target
50-100% of target
<50% of target
Cost
Cost per successful outcome
≤budget
1-1.5x budget
>1.5x budget
Business impact
KPI lift compared to baseline
Significant
Marginal
None or negative
Green means scale: the agent beats baseline while meeting cost and quality thresholds. Yellow means tune: promising but needs work. Red means retire or redesign: the agent consumes cost without enough measurable value. The willingness to actually retire a red agent is what makes the rest of the scorecard credible.
Conclusion
In this post, you learned how to calculate the true cost of a model by accounting for four hidden cost drivers (tokenizer efficiency, output alignment, agentic loop efficiency, and reasoning overhead), how to reduce cost per task through prompt caching, model routing, output constraints, and batch inference, and how to prove agent ROI by measuring human baselines, instrumenting workflows as experiments, joining cost to outcomes, and running holdout comparisons.
The cost optimization half answers “why is this expensive and how do I fix it.” The ROI half answers “is the agent better than the humans were.” Together with Part 1’s operating model (attribute, observe, enforce, optimize, operate), they form a complete framework: you can see who spent it, explain why, reduce the waste, and justify what remains.
To get started, benchmark your top model candidates against your own prompts using Amazon Bedrock model evaluation, capture tokens and turns from the usage block or your invocation logs, price them against current Bedrock pricing, and divide by success rate. For ROI measurement, consult the Well-Architected Agentic AI Lens for agent cost governance best practices.
If you have found other techniques for reducing cost per task or measuring agent ROI on Amazon Bedrock, let us know in the comments.
About the authors

 Studio